Mapping questions thread
#301 Posted 11 November 2015 - 01:23 PM
The instructions say: " The direction of the water texture's movement is determined by its relative alignment (R key) and flipping (F key) settings ". Since Mapster does not show the texture moving, how other than trial and error do I figure out how to set the texture for proper direction? As you press those keys I can see a field changing for that sector with "angles" and "mirrored" but I still don't know what it will look like until I load the map in Eduke. There must be a better way??
#302 Posted 11 November 2015 - 01:53 PM
Rhaisher, on 09 November 2015 - 05:06 PM, said:
makes no difference if the door is in contact with both floor and ceiling. The door sector has to be clear of other walls & sector lines when open, closed, or while in the process of opening / closing.
e.g if the door sector at the SE where it 'hinges' clips into the wall sector it's sitting next to when it swings open, you'll get a messy visual glitch.
This post has been edited by Forge: 11 November 2015 - 01:55 PM
#303 Posted 11 November 2015 - 02:31 PM
Mark., on 11 November 2015 - 01:23 PM, said:
It is a right bugger isn't it ?
I find this usually gets me 90% of the way there. If you have a rectangular sector with your SE24, make the sector's first wall the one immediately to the right of the SE24 angle the first wall e.g. if SE24 is pointing right, make bottom wall first wall. Now set relative on the sector. This will give you a consistant movement in the direction the SE24 is pointing. If you have a three-sided sector .. good luck !! Avoid three sided sectors, if you are using such a sector to join two conveyors at 90 degrees you will save much sanity by making the 45 degree join a foor sided sector.
Think of it that by only setting relative on the floor (no flipping), the texture slides along the edge of the first wall.
Example attached. I know you'll know this, but for the benefit of anyone else that might be lurking, if you press F4 the first wall of a sector will be highlighted.
TTFN,
Jon
PS: Just for completeness, if you are using a continuous loop conveyor Eduke32 has rounding errors that will soon cause some objects to eventually fall of the conveyor. The only fix - assuming you can hide part of the conveyor - seems to be to break the loop and connect the two ends using a crane to drop items back into the center of the conveyor. I tried thinning the conveyor sector's walls at some point to try and nudge sprites back on course but this didn't work.
Attached File(s)
-
conveyor.zip (732bytes)
Number of downloads: 405
This post has been edited by The Mechanic: 11 November 2015 - 02:42 PM
#304 Posted 12 November 2015 - 12:46 PM
#305 Posted 30 November 2015 - 11:48 AM
I've been using a Duke sprite scaled in a way that his head fits, more or less, with what you see in first person with your view centered. But I find this method a little imprecise and would like to know if there's a better way that experienced mappers know.
#306 Posted 30 November 2015 - 12:01 PM
Rhaisher, on 30 November 2015 - 11:48 AM, said:
I've been using a Duke sprite scaled in a way that his head fits, more or less, with what you see in first person with your view centered. But I find this method a little imprecise and would like to know if there's a better way that experienced mappers know.
Basically when you hit CAPS lock to toggle the movement mode, there's one preset where your view height matches the ingame view height (and pressing A does a little jump, but this nowhere near matches the ingame jump) That's the best way to use it - also the size of ingame enemies as well as duke is 40x40 - when you place enemies, if you size them so they match those dimensions you'll get a good idea of what they'll look like ingame
#307 Posted 30 November 2015 - 12:05 PM
#308 Posted 01 December 2015 - 12:00 AM
#309 Posted 01 December 2015 - 02:25 AM
Rhaisher, on 30 November 2015 - 11:48 AM, said:
I've been using a Duke sprite scaled in a way that his head fits, more or less, with what you see in first person with your view centered.
It's worth a look at the Dimensions at infosuite. This will give you some limiting sizes.
Examples: Minimum height of ceiling for duke to walk in = 11 (i.e. 11 pgup's). So, for an interior door give him lets say 3 units clearence, that's a ceiling of 14. Usually the bit above the door is slightly lower than the room's ceiling, so make room ceiling 16.
Want to create some cover so that duke can hide behind it but then pop up to take a few shots ? Floor needs to be 8 or less (and more than 6???). Want Duke to jump onto something ? No higher than 20 units then.
If you are starting from a clean sheet and going "how big should this be" then those numbers provide a starting point . As has been rightly pointed out, you may need to make a door a different size so handle is in sensible place, or tweak it just to get it look better from different places/angles. But you'll not be far off.
Quote
I've always wondered wjy Mapster32 didn't do this as standard, both enemies and items such as weapons.
TTFN,
Jon
#310 Posted 01 December 2015 - 02:35 AM
However, regardless it will take a bit of time to get it right. This is because Duke runs so much faster and jumps higher than real life humans. Therefore, if you make a 100% realistic size, then you'll hit your head on the ceiling every time you jump, and you won't be able to run for more than a second without bumping into something. This results in the need for a compromise between realistic sizes, and a larger size which accommodates Duke's movement.
The exact size to build for is difficult to describe, however generally speaking rookie mappers tend to build too large. The other thing to consider is that a smaller room is much easier and faster to add details to than a larger room. Therefore, I'd recommend building slightly on the smaller side if you're unsure what scale to go for. Just remember that any room should be tall enough that you can jump properly.
#311 Posted 02 December 2015 - 02:35 AM
Rhaisher, on 30 November 2015 - 11:48 AM, said:
I've been using a Duke sprite scaled in a way that his head fits, more or less, with what you see in first person with your view centered. But I find this method a little imprecise and would like to know if there's a better way that experienced mappers know.
When I started to map I first placed one of these girls like FEM3 (sprite #1321) somewhere which seems to fit best in 32x32. I also spread some APLAYER sprites (#1405) around the map which you'd need for multiplayer anyway. The correct size of these is 36x36. Like Jblade said it's a good idea to resize the enemy sprites to 40x40 and items like ammo and weapons to 32x32. Read the Infosuite for more details. There are exceptions like the shark (60x60) or the recon which appears ingame in the size you choose but IMO would match the game scale in 56x56.
Have fun
mono20
#312 Posted 12 December 2015 - 07:50 AM
Cyclers may be triggered by switches and touchplates easily - but is there a trick to trigger a cycler by explosion?
TIA
mono20
#313 Posted 12 December 2015 - 12:25 PM
mono20, on 12 December 2015 - 07:50 AM, said:
Cyclers may be triggered by switches and touchplates easily - but is there a trick to trigger a cycler by explosion?
TIA
mono20
If you mean blowing hole in wall or simply blowing up gas bottles, then not directly since these don't generate activators.
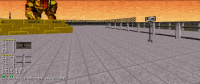
You may do it indirectly, see attached file. A cycler is active from the start; the floor and ceiling are hidden behind floor aligned sprites (both floor and ceiling) and - important - the sprite's flags have 2048 added which makes them unaffected by sector brightness (i.e. the cycler) (you'll notice flags set to 2080 decimal, or 820 in hex, since flags include floor aligned and blocking flags, etc - you edit flags using the F8 key). They are also given a hitag to make them destructable and I placed a gas bottle that'll blow them up (the tags used on the sprites are completely independent of that used on the bottle - they simply mark the sprites as destructable and ensure all sprites with the same hitag blow up together).
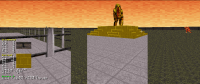
Walls are a bit more of a problem. Firstly, the two walls bordering my flashing sector are hitagged (value is irrelevent, I use the value '1') which makes them unaffected by the cycler. Now, the trick here is to use a very thin help sector around these two walls with another cycler in it which opens after an explosion. In the map I tagged a gas bottle to the SE13 placed in the thin sector so after explosion sector opens up revealing walls will flash as expected. You need to make that sector thin as possible.
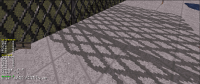
Not perfect - enemies straying into the sector will flash before explosion - but maybe making enemies stay-put will work in your map ?
If using this effect in many places, or in large areas (all those sprites on floor/ceiling will become a pain), or simply done properly without the potential side effects/glitches of my example, then it is worth investing time in doing it via CON file code.
TTFN,
Jon
Attached File(s)
-
post-bang-cycler.zip (404bytes)
Number of downloads: 410
This post has been edited by The Mechanic: 12 December 2015 - 12:28 PM
#314 Posted 12 December 2015 - 02:47 PM
The Mechanic, on 12 December 2015 - 12:25 PM, said:
Thanks for sharing that nice workaround which surely looks great when placed cleverly. Too bad I can't use it for my current project because I want the explosion to turn the lights off and I have a ton of cyclers spread around a big complex area. I don't want to go into CON editing so if I can't find anything better the cyclers will have a Hitag and eventually get turned off by a touchplate after the explosion.
Greetings
mono20
#315 Posted 12 December 2015 - 04:20 PM
mono20, on 12 December 2015 - 02:47 PM, said:
Greetings
mono20
Ah, I assumed you wanted to turn on with explosion. OK.
The wall effect can be flipped, just dont tag the red walls that I tagged and remove the cycler from the thin helper section. Now the walls will cycle until the explosion.
Not sure about the floor though; it might work if you change the two wall/floor sprites so the DO change with sector brightness but arrange so that when destroyed they expose two extra sprites that have the dont-change-with-sector flag set. Worth a try.
If you don't want to get involved in CON coding but don't mind using a ready-made CON library (no further coding required) I may be able to help. PM me if interested.
TTFN,
Jon
#316 Posted 14 December 2015 - 11:53 AM
The first image shows how the things should be, and second one shows a bug that happens when I move to a certain position.
I think it has something to do with TROR, 'cause this fence is a masked wall, so would it be?
Anyway, thanks.
This post has been edited by Meaningless Wounds: 14 December 2015 - 12:01 PM
#317 Posted 14 December 2015 - 12:02 PM
#318 Posted 14 December 2015 - 12:04 PM
Mark., on 14 December 2015 - 12:02 PM, said:
Oh, I think that's it.
I lowered the ceiling of the fence sector, probably that's causing the problem.
Thanks
EDIT:
Ops, problem is persisting, and I can't upload map files yet apparently.
A screenshot in 2D mode would help?
This post has been edited by Meaningless Wounds: 15 December 2015 - 01:03 PM
#320 Posted 14 December 2015 - 12:16 PM
Mark., on 14 December 2015 - 12:13 PM, said:
I see, so I think I'll delete the sector and replace the wall with sprites then.
Maybe that solves the problem...
Now another problem, I can't delete red walls moving over white ones, how do I delete the red ones then?
This post has been edited by Meaningless Wounds: 14 December 2015 - 12:23 PM
#321 Posted 14 December 2015 - 12:53 PM
Remember, never move sectors outside of their parent sectors, and never have walls cross over each other. Copy and paste the sector into a different area instead.
You don't delete red walls: you join the sectors.
This post has been edited by Micky C: 14 December 2015 - 12:54 PM
#322 Posted 14 December 2015 - 03:31 PM
Micky C, on 14 December 2015 - 12:53 PM, said:
Remember, never move sectors outside of their parent sectors, and never have walls cross over each other. Copy and paste the sector into a different area instead.
I already solved the problem with sprites.
And I deleted the inner sector, and then, the red walls which has turned white, I deleted them.
But thanks anyway ^^
This post has been edited by Meaningless Wounds: 14 December 2015 - 03:31 PM
#323 Posted 14 December 2015 - 04:40 PM
I know the 2/4/6/8 keys, but I want to manipulate their angles, just like you manipulate walls.
Anyway possible?
#324 Posted 15 December 2015 - 01:36 AM
Meaningless Wounds, on 14 December 2015 - 04:40 PM, said:
I know the 2/4/6/8 keys, but I want to manipulate their angles, just like you manipulate walls.
Anyway possible?
Press the 'R' key on the sprite. You can now use the < and > keys to rotate. If in 3D mode, press 'S' while pointing at a wall and sprite will be placed on wall with the 'R' key effectively automatically pressed and the sprite at the correct angle to match the wall, so this is referred to as wall aligned.
If you press the 'R' key a second time, the sprite will lie flat but note that some textures don't work in this mode (or at least didn't work).
Press 'R' a third time to return sprite to default always-facing-player mode.
TTFN,
Jon
You can use the 'R' key on enemies but it doesn't look right though does have some odd effects such as the Liztroop's shots have no effect.
#325 Posted 15 December 2015 - 02:12 AM
Meaningless Wounds, on 14 December 2015 - 04:40 PM, said:
I know the 2/4/6/8 keys, but I want to manipulate their angles, just like you manipulate walls.
Anyway possible?
If you haven't looked at it already, I'd strongly suggest going through the Infosuite. It's an absolutely fantastic mapping guide, that even veteran mappers still reference every now and then: http://infosuite.duke4.net/
#326 Posted 15 December 2015 - 09:19 AM
The Mechanic, on 15 December 2015 - 01:36 AM, said:
If you press the 'R' key a second time, the sprite will lie flat but note that some textures don't work in this mode (or at least didn't work).
Press 'R' a third time to return sprite to default always-facing-player mode.
TTFN,
Jon
You can use the 'R' key on enemies but it doesn't look right though does have some odd effects such as the Liztroop's shots have no effect.
That's not exactly what I meant...
To manipulate the angles of walls, you use the points they have, right? (In 2D mode)
So, I want manipulate a sprite in that way, adding points and distorting its texture.
Look at this picture:
I placed the same sprite of the masked wall, it is floor aligned already, but I want to distort their parts that are passing through the wall
I basically want to make a proper shadow.
(Hope you get me 'cause I'm bad at explaining things.)
Micky C, on 15 December 2015 - 02:12 AM, said:
I went there already, it helped me a lot, but I didn't find a tutorial or anything about this...
This post has been edited by Meaningless Wounds: 15 December 2015 - 10:45 AM
#328 Posted 15 December 2015 - 03:41 PM
Mark., on 15 December 2015 - 12:45 PM, said:
Oh, okay ¥-T
#329 Posted 16 December 2015 - 07:35 AM
I'm interested in spawning enemies whenever a babe gets killed as well. It works through a channel or do I have to do something else?
Yes... I know that a typical newbie mistake is to place ammo inside every bin and make every killed babe spawn enemies. I don't intend to do so, fear not.
#330 Posted 16 December 2015 - 07:51 AM
Rhaisher, on 16 December 2015 - 07:35 AM, said:
I'm interested in spawning enemies whenever a babe gets killed as well. It works through a channel or do I have to do something else?
Yes... I know that a typical newbie mistake is to place ammo inside every bin and make every killed babe spawn enemies. I don't intend to do so, fear not.
Have a look here: http://wiki.eduke32....ng_with_Sprites
It´s near the end of the page.