Duke4.net Forums: Duke3D HRP: new/updated art assets thread - Duke4.net Forums

Jump to content

  • 161 Pages +
  • « First
  • 38
  • 39
  • 40
  • 41
  • 42
  • Last »
  • You cannot start a new topic
  • You cannot reply to this topic

Duke3D HRP: new/updated art assets thread  "Post and discuss new or updated textures/models for the HRP here"

User is online   Danukem 

  • Duke Plus Developer

#1171

View PostPiterplus, on May 29 2010, 07:03 AM, said:

But right now we use some sort of compromise withing fake lighting drawed by artist and normal maps applied.


Personally, I like the compromise method because it means that the HRP can still look good without Polymer, and that's important for some of us for whom performance is a big issue.
0

User is offline   Night Wolf 

#1172

View PostPiterplus, on May 30 2010, 12:03 AM, said:

Not totally, but partly. See here:
Posted Image

You have made circles lighter (1), and that was quite correct - thay are indeed have lighter tone.
But other parts of the image still looks darker than original, they looks flat (2, 3). Of course they should look sculptured (as noted Parkar). It may be achieved by: skilled work of normal map artist - or by you - you see my point. To be extreemely strict - with best normal map (and spec map) technicue this texture should be just flat green with no shapes etc. But right now we use some sort of compromise withing fake lighting drawed by artist and normal maps applied.


Ahhh I see what you mean about 2... I don't know why I didn't see that ... that also reminded me of the file I had before I lost it ... I kind of crumpled the edge there so it wasn't totally square .. I forgot to add that in again

not so sure what you mean by 3 though , should I just make 3 appear flat green? no shadowing?

or should I just exactly follow the contrasts of the original tile?
0

User is offline   LeoD 

  • Duke4.net topic/3513

#1173

Maybe it's too late to put in my 2 cent but I think the original looks like stone (imagine some overgrown old temple wall in Angkor Wat) while your version looks more like carved wood which does not fit too well in E2L4.

View PostDeeperThought, on May 29 2010, 04:12 PM, said:

Personally, I like the compromise method because it means that the HRP can still look good without Polymer, and that's important for some of us for whom performance is a big issue.

Yep, I agree to that.
0

User is offline   Night Wolf 

#1174

View PostLeoD, on May 30 2010, 12:30 AM, said:

Maybe it's too late to put in my 2 cent but I think the original looks like stone (imagine some overgrown old temple wall in Angkor Wat) while your version looks more like carved wood which does not fit too well in E2L4.


Yes I also think it looks like stone, like a temple wall... and that's what im going for :(
0

User is offline   Tea Monster 

  • Polymancer

#1175

I agree with Parkar that these would benefit from sculpting. All that lumpy, organic-looking detail is made for Z-Brush or Sculptris.

I thought that this was the PHRP - separate from the old HRP. Is that right? This pack should be created as much as possible for next-gen systems, otherwise we will be doing all this again in a year's time.

This post has been edited by Tea Monster: 29 May 2010 - 07:45 AM

0

User is offline   Piterplus 

#1176

That I meant - is - those objects are not some geometrical figures - they are if fact sticking out kind of rocks or organics: see an example:
Posted Image

This post has been edited by Piterplus: 30 May 2010 - 02:43 AM

0

User is online   Danukem 

  • Duke Plus Developer

#1177

View PostTea Monster, on May 29 2010, 08:43 AM, said:

I thought that this was the PHRP - separate from the old HRP. Is that right? This pack should be created as much as possible for next-gen systems, otherwise we will be doing all this again in a year's time.


Are you saying that the current mixed method -- fake lighting drawn by artist and normal maps applied -- is not good enough for Polymer?

As far as I'm concerned (as a player) there is only one HRP, and that's the one you guys have been working on that has normal maps and such. I would not want to go back to an old HRP, even if I were using Polymost. Polymer should be the primary target, but if it can also look good in Polymost without sacrificing quality, then why not? I guess what I'm really asking is, does it sacrifice quality to still have some fake lighting supplied by the artist?
0

User is offline   Plagman 

  • Former VP of Media Operations

#1178

This compromise already exists and it's already in the HRP. This tile already a replacement that looks more or less like the original (though it could benefit from some color adjustments) with baked lighting. You're making a diffuse map but you're not making the normal map that goes with it; I don't think this approach makes any sense since the tile is going to look ugly on its own, and you can't just use a tool to generate a normal map out of a complex tile like that. The diffuse and normal maps have to be created at the same time.

View PostDeeperThought, on May 29 2010, 09:55 AM, said:

Are you saying that the current mixed method -- fake lighting drawn by artist and normal maps applied -- is not good enough for Polymer?


It's not really the current method, though. Parkar (and Roma Loom recently) created a bunch of diffuse maps to replace the old replacements in Polymer, and you can clearly see the difference of quality in game. However they look very plain in Polymost, so the old version should be used there. The bathroom/cinema door is a good example of that.
0

User is offline   Spiker 

#1179

I believe Plagaman is to implement something that will allow load separate set of textures for polymer and polymost based on name suffix. So the textures that you make now should be polymer exclusive.
0

User is online   Danukem 

  • Duke Plus Developer

#1180

I have seen the light! Now that I think about it, the HRP should be made for Polymer only. Modern lighting goes hand-in-hand with models and hi-res textures to give the game a more modern look. The only reason a player would want to use the HRP with Polymost is for better performance. Personally, I will just eschew the HRP entirely when I want better performance. I never really liked the look of the old HRP with Polymost anyway.

Since the HRP without Polymer is a compromise at best, it doesn't seem to be worth expending much effort on. Having two different versions of the HRP is necessary in this transition phase, but eventually the PHRP should be the one and only.

This post has been edited by DeeperThought: 29 May 2010 - 09:24 AM

0

User is offline   Tea Monster 

  • Polymancer

#1181

Not trying to belittle anyone's efforts, but I personally think that the stuff done by Roma Loom, which is all done in 3D, looks better for complex tiles.
Most of the standard wall tiles have worked well with 2D art and added normal maps. I don't see any point in making a model of most of the interior and exterior architectural tiles. The problems seem to occur when you have tiles that are supposed to represent machinery or organic shapes with lots of relief. Although it's possible to make a normal map in 2D, you are probably going to wind up making a 3D model of the tile to get a decent height and normal map of the thing anyway. Once you have done that, it's a hop, skip and a jump to render off a diffuse to go with it. So you are duplicating a lot of effort.

On the subject of HRP vs. PHRP - you are downloading a massive amount of tiles that you will never use if you use the PHRP with Polymost. Polymost can't take advantage of specular or normal maps, which are part of the PHRP. All the PHRP tiles will look washed out as there is no faked light and shadow effects on them - which poor old sad Polymost can't fill in for.

So...

1. Looks washed out.
2. Download shed load of unuseable tiles.
0

User is offline   Night Wolf 

#1182

Ive been tweaking this for ages to match this as close as possible to the original whilst making a more realistic approach to it..

screenshot

Posted Image
0

User is offline   Tea Monster 

  • Polymancer

#1183

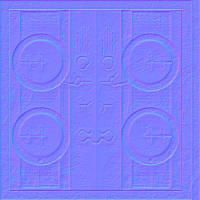
Here is a normal map I generated out of Nvidias plug-in.
As said earlier, I think this needs a sculpt to get a decent map, but this is to test with at the moment.
Attached Image: tilenormal.png
0

User is offline   Night Wolf 

#1184

View PostTea Monster, on May 30 2010, 08:10 AM, said:

Here is a normal map I generated out of Nvidias plug-in.
As said earlier, I think this needs a sculpt to get a decent map, but this is to test with at the moment.
Attachment tilenormal.png


what exactly do you mean by sculpt ... is that like a blender thing , like making a model?
0

User is offline   Night Wolf 

#1185

getting closer
The proportions are nearly 100% match .. except for one symbol which I can easily nudge over a bit.
if you put one on top on the other you will see what I mean
Posted Image
0

User is offline   Night Wolf 

#1186

This is a failed attempt of a height map I generated but you get the idea :(
Posted Image
0

User is offline   Tea Monster 

  • Polymancer

#1187

I still love it when I see stuff like that!

A sculpting program is just that. You usually build a base mesh which is a simplified version of the model. Then you take the model in the sculpting program and you can push and pull the mesh around like it was made of clay. The program subdivides the mesh a ridiculous number of times so that you are not working with individual polygons like you would in Max and Blender. You litterally sculpt with digital 'brushes' that act like sculpting tools. Z-Brush and Muxbox are the big names, but there is a freebie out there called Sculptris which is pretty good. Also, you can sculpt in Blender.
0

User is offline   Roma Loom 

  • Loomsday Device

#1188

View Postozz, on May 30 2010, 10:27 AM, said:

This is a failed attempt of a height map I generated but you get the idea :(
Posted Image

It looks very good for semi-organic texture imo, except for shadows being too dark for a polymer texture. The thing is... with all the crits above you were forced to make your texture very close to original which makes this texture good for polymost but a bit far for polymer. I guess you should post a version with shadows that are 30-50% less contrast, so we could put the one you've posted as a polymost texture and the new you will post as a polymer one. I guess people should get used to the fact that polymer textures will never look like original at least when posted here as a raw picture.
0

User is offline   Night Wolf 

#1189

View PostRoma Loom, on May 30 2010, 09:59 PM, said:

It looks very good for semi-organic texture imo, except for shadows being too dark for a polymer texture. The thing is... with all the crits above you were forced to make your texture very close to original which makes this texture good for polymost but a bit far for polymer. I guess you should post a version with shadows that are 30-50% less contrast, so we could put the one you've posted as a polymost texture and the new you will post as a polymer one. I guess people should get used to the fact that polymer textures will never look like original at least when posted here as a raw picture.


Cheers , at least I know now that I was right all along with shadows I was a bit confused with that....
yeah it shouldn't be to hard to lighten the contrast of the shadows.. ill post both up ...even though I thought polymost was dead
0

User is offline   3D Master 

#1190

View Postozz, on May 30 2010, 02:23 PM, said:

Cheers , at least I know now that I was right all along with shadows I was a bit confused with that....
yeah it shouldn't be to hard to lighten the contrast of the shadows.. ill post both up ...even though I thought polymost was dead


All the shapes are still too sharp and polished looking though. This should really look less precise, and the shapes inside the circles thicker and larger and tapper off more instead of going straight down to the bottom of the circle. Running a color match over it would help as well.

This post has been edited by 3D Master: 30 May 2010 - 04:34 AM

0

User is offline   Roma Loom 

  • Loomsday Device

#1191

It's really hard to accept, but yeah, polymost is dead. If only there were at least 5 people working on polymer textures I'd vote for HRP and pHRP separation...
0

User is offline   Night Wolf 

#1192

View Post3D Master, on May 30 2010, 10:33 PM, said:

All the shapes are still too sharp and polished looking though. This should really look less precise, and the shapes inside the circles thicker and larger and tapper off more instead of going straight down to the bottom of the circle. Running a color match over it would help as well.


This texture was chiselled by Duke himself

Don't judge by that shot with the hight map its totality wrong... and come out looking sharp ... I just wanted to show what hight could look like...
The green I've used is the same green for the original selected from the Eyedropper tool.
considering what i've done so far its almost an exact match, its alot harder then it looks ... so don't hope for an exact high res version of the 8bit art ,.. that's just stupid
0

User is online   Danukem 

  • Duke Plus Developer

#1193

View PostRoma Loom, on May 30 2010, 04:59 AM, said:

It looks very good for semi-organic texture imo, except for shadows being too dark for a polymer texture. The thing is... with all the crits above you were forced to make your texture very close to original which makes this texture good for polymost but a bit far for polymer. I guess you should post a version with shadows that are 30-50% less contrast, so we could put the one you've posted as a polymost texture and the new you will post as a polymer one. I guess people should get used to the fact that polymer textures will never look like original at least when posted here as a raw picture.


If response to uninformed criticisms are making the tile worse for Polymer, then I suggest either that you guys learn to ignore such criticisms, or post screenshots of how it will look in game with Polymer so that people understand how it will actually look before criticizing.
0

User is offline   Roma Loom 

  • Loomsday Device

#1194

I totally agree. It's just a matter of time for Ooz to make a final step on the dark side polymer side since he has the src to his own textures to make normal + height maps... However it's not really a problem splitting yourself between polymost and polymer textures, since making a polymost texture from polymer one is very easy by adding a layer with shadows and highlights and adding some contrast to the whole texture.
0

User is offline   Night Wolf 

#1195

yeah it seems a few people dont know what there talking about with polymer textures..
im only going to listen to the few that do... as its confused me, when I was on the right track all along.

well I can't really make normal maps I just used some Nvida photoshop plug in, which makes them automatically, and they come out shit ...
you also have to understand I have little knowledge of creating game textures, essentially im just trying to recreate the old art ... but then thinking about the logic of how polymer works

Anyway, is this better ... I've tuned the shadows down around 30 -50%
Posted Image
0

User is offline   3D Master 

#1196

View Postozz, on May 30 2010, 03:40 PM, said:

This texture was chiselled by Duke himself

Don't judge by that shot with the hight map its totality wrong... and come out looking sharp ... I just wanted to show what hight could look like...


I'm not talking about the height map at all, I'm talking about the texture itself.

Quote

The green I've used is the same green for the original selected from the Eyedropper tool.


Which is the problem. When you use that tool you take the color of just one pixel, while the green a texture exudes is a mixture of different shades that's seen by your eyes as a certain shade. For example, there is no such thing as grey hair. There is only white hair. But white hair with normal hair color around and underneath it, is seen by your eyes as grey. The result of making your entire texture the green of one pixel, equals a color that is off, and it's easily visible. Your texture seems more like old moss-covered wood, while the original is some odd organic compound.

For this, there is the color match option.

This post has been edited by 3D Master: 30 May 2010 - 09:41 AM

0

User is offline   Roma Loom 

  • Loomsday Device

#1197

I'm afraid that you are doomed to learn how to create normal maps Ooz :( It's just a matter of time...
Just take a look here for example once you feel the right mood for learning: http://www.katsbits.com/tutorials/textures...s-or-images.php

All you need is to create the heightmap before generating normalmap. You have to create a greyscale image where the brightness of pixels represents the height of the the elements on your texture. So basically you should:
1. Hide the layers that are responsible for shadows (except misc small cracks etc)
2. Using the layers that represent misc elements, boost their brightness proportionally to their imaginary height
3. Once you collapse all tweaked layers into one, desaturate it and prepare for creating normal map.

Normalmapping:
1. make few copies of your heightmap (3 for instance)
2. Apply NVidia's filter to the first copy (tweak the scale param in the filter to make the deepest result but not "overburned" one)
3. Blur the generated normal map with Gaussian blur with 3pixels radius for instance
4. Take another copy of your heightmap, apply NVidia's filter on it maybe with less scale (requires experimenting) and blur it with 1.5pixels raduis
5. Take the last heightmap, apply normal filter to it with min possible scale factor which will reveal only the cracks and surface detail, but not the shapes of the elements - don't blurr this one at all
6. blend all three normalmap layers with "overlay"mode and collapse into one layer, save as xxxx_n.png
7. Open that xxxx_n.png and add an alpha channel to it, then copy your original heighmap into alpha channel and blur it with gaussian 1.0 for example, then press save

finally you should get something like this but more clear since you have the src file with layers: height, nrml, spec
Posted ImagePosted ImagePosted Image

This post has been edited by Roma Loom: 30 May 2010 - 09:44 AM

0

User is online   Danukem 

  • Duke Plus Developer

#1198

View Post3D Master, on May 30 2010, 10:36 AM, said:

Which is the problem. When you use that tool you take the color of just one pixel, while the green a texture exudes is a mixture of different shades that's seen by your eyes as a certain shade. For example, there is no such thing as grey hair. There is only white hair. But white hair with normal hair color around and underneath it, is seen by your eyes as grey. The result of making your entire texture the green of one pixel, equals a color that is off, and it's easily visible. Your texture seems more like old moss-covered wood, while the original is some odd organic compound.

For this, there is the color match option.


You may have a point there about using the eye dropper but you are overstating it. It's not like he decided to make the whole thing one shade of green. The in-game screenshot looks pretty badass.
0

User is offline   Piterplus 

#1199

Quote

yeah it seems a few people dont know what there talking about with polymer textures..
im only going to listen to the few that do... as its confused me, when I was on the right track all along.

I suppose it was me (who do not know)...
anyhow:
Posted Image

Posted Image

This post has been edited by Piterplus: 30 May 2010 - 09:55 AM

0

User is offline   Roma Loom 

  • Loomsday Device

#1200

Yeah, so thingies should be like Piterplus pointed out, otherwise they are a bit hi-tech-y or artificial...
0

Share this topic:


  • 161 Pages +
  • « First
  • 38
  • 39
  • 40
  • 41
  • 42
  • Last »
  • You cannot start a new topic
  • You cannot reply to this topic


All copyrights and trademarks not owned by Voidpoint, LLC are the sole property of their respective owners. Play Ion Fury! ;) © Voidpoint, LLC

Enter your sign in name and password


Sign in options