Duke4.net Forums: [RELEASE] EDuke32 Addon Compilation - Duke4.net Forums

Jump to content

  • 68 Pages +
  • « First
  • 45
  • 46
  • 47
  • 48
  • 49
  • Last »
  • You cannot start a new topic
  • You cannot reply to this topic

[RELEASE] EDuke32 Addon Compilation  "Version 3.13 released on December 6, 2016!"

#1381

View PostTheDragonLiner, on 02 September 2021 - 05:56 AM, said:

ALSO, I know ahead of time, that I will not have the patience to go through that pyramid from "Temple of Illusions 3" in order to establish an optimal path. Doom64Hunter (or anyone else), if you're still in service, I have a mission for you here !!

Right now I should really focus on more important things, but I might get to it eventually. Just note down if you find any more weirdly convoluted mazes, and I'll take a look at it down the line, it's been a while since I last played through the TC in full.

And then there's also Trequonia, but that isn't part of the Addons Compilation, at least right now.

This post has been edited by Doom64hunter: 02 September 2021 - 10:42 AM

1

User is online   NightFright 

  • The Truth is in here

#1382

Trequonia is even worse than Oblivion AFAIK. A nightmare. If you like encounters with troopers that can take 40 shotgun hits before going down, excessive platforming and 20 huge maps with cryptic design and dickish enemy placement - knock yourself out, but do it on your own, please. You just have to be a true sadist to enjoy this thing.
Besides that, it's also a behemoth regarding filesize and would bloat the compilation significantly. And to justify that, it would have to be a really, really good addon which many, many people would want to play. Trequonia isn't that kind of mod, believe it. Already have to fight against my stomach switching to reverse digestion mode when just thinking about adding this.

This post has been edited by NightFright: 02 September 2021 - 02:19 PM

1

User is offline   ETPC 

#1383

i would like to say that the constant fullscreen flashing in oblivion (seriously what the fuck) means that it likely wouldn't be a bad idea to put in a warning for image sensitivity. i'm not image sensitive at all and i frequently had to look away with those fuckin weird amiga ball attacks enemies sometimes do.
0

#1384

NightFright. But ... but .... I like Trequonia T_T Personally, I find that Trequonia is actually more fair in level design compared to Oblivion. It's more complex sure, but it's not completely obscure and there are more hints for level progression. I don't know if enemy placement is dickish BUT they sure are problematic sometimes >_>
Personally the one thing that makes me shiver whenever I think about it is the CPU Troopers and the Distroopers X_X The formers are a good bad idea, the latters are the ultimate worst and they appear as you have too little to deal with them X_X

Lastly, I do agree that Trequonia would be too problematic to include in the compilation, not only for file size but also because it's an HRP mod and as far as I can tell, there ain't no HRP mod in the compilation (for a reason *wink*) and it would thus kinda intrude IMO ...


ETPC. This is an interesting issue actually ! The Amiga Balls you're talking about. If you check out Zaxtor's videos of the mod, you will notice that the intended effect of the balls is to apply a weird color filter to your screen. Personally, I never experienced it the intended way. It's always that brutal white flash you're mentioning, and it is irritating indeed X_X The Jester boss in E5L4 is rendered much more difficult and eye-raping than intended because of that >_>

Look at this video >> Oblivion mod, The boss of E5L4 The Death Jester - YouTube
0

User is online   NightFright 

  • The Truth is in here

#1385

Regarding the Oblivion walkthrough: Since we are dealing with a mere text file, screenshots with a comment like "it's here" won't cut it, I'm afraid. You will have to describe the location, and if you can't, at least try to give an idea about when it's happening, e.g. "before you find the blue keycard" or "after the room with a Battlelord Sentry ambush" etc.

You can still keep the screenshots for an online guide, but I'll need a text only edition. It's harder but doable, just look at all the other walkthroughs in the text file as examples.

And yeah, Trequonia containing lots of HRP assets was another reason why I didn't want to add it. Thanks for reminding me about that one.

This post has been edited by NightFright: 02 September 2021 - 11:04 PM

2

#1386

View PostNightFright, on 02 September 2021 - 11:03 PM, said:

Regarding the Oblivion walkthrough: Since we are dealing with a mere text file, screenshots with a comment like "it's here" won't cut it, I'm afraid. You will have to describe the location, and if you can't, at least try to give an idea about when it's happening, e.g. "before you find the blue keycard" or "after the room with a Battlelord Sentry ambush" etc.

You can still keep the screenshots for an online guide, but I'll need a text only edition. It's harder but doable, just look at all the other walkthroughs in the text file as examples.

And yeah, Trequonia containing lots of HRP assets was another reason why I didn't want to add it. Thanks for reminding me about that one.


I hadn't thought about that T_T
Well, for Episode 1's secret levels, you already have everything nice and sweet right now right ?

For the other episodes, I'll try to include a full-text version inside my Hints List, whenever I will play them. Because right now, I can't explain anything in full text, wtihout having the game next to me ^^;
Right now, I am writting hints for the Episode 5 Secret when accessed by the "Dry Forest". And I already know, what I am going to write about the latter (the forest).


Lastly, I think it would be a good idea to write down a bunch of "General Hints" about the mod in order to avoid repetitions and make people more aware of what they're in for. I already have a bunch of ideas. It would also be the perfect moment to mention the very special way the 7th weapon works as well.
Just give me time and I will upload this whenever I'll be almost done with Ep1.
0

#1387

View PostTheDragonLiner, on 02 September 2021 - 10:13 PM, said:

ETPC. This is an interesting issue actually ! The Amiga Balls you're talking about. If you check out Zaxtor's videos of the mod, you will notice that the intended effect of the balls is to apply a weird color filter to your screen. Personally, I never experienced it the intended way. It's always that brutal white flash you're mentioning, and it is irritating indeed X_X The Jester boss in E5L4 is rendered much more difficult and eye-raping than intended because of that >_>

Look at this video >> Oblivion mod, The boss of E5L4 The Death Jester - YouTube


Originally in DOS Duke3D, using palfrom with an intensity ranging between 64 and 127 (inclusive) caused the colors to become inverted. This never worked in OpenGL for eduke32, but evidently, based on his videos, Zaxtor never intended to blind the player.

This was changed somewhere between r1623 and r1637. Unfortunately, further bisecting is impossible due to game crashes.

By analyzing the changelog however, I suspect that this was altered in r1625 (commit bb45b28c201d498e153af3b28f448ff66458a917), namely because of the following modification to G_FadePalette:

Before:
-void G_FadePalette(int32_t r,int32_t g,int32_t b,int32_t e)
 {
-    int32_t tc;

-    setpalettefade(r,g,b,e&127);
-    if (getrendermode() >= 3) pus = pub = NUMPAGES; // JBF 20040110: redraw the status bar next time
-    if ((e&128) == 0)
     {
-        nextpage();
-        for (tc = totalclock; totalclock < tc + 4; handleevents(), Net_GetPackets());
     }
}


After:
+void G_FadePalette(int32_t r,int32_t g,int32_t b,int32_t e)
+{
+    setpalettefade(r,g,b,e&63);
+
+//    if (getrendermode() >= 3) pus = pub = NUMPAGES; // JBF 20040110: redraw the status bar next time
+    if ((e&128) == 0)
+    {
+        int32_t tc;
+        nextpage();
+        for (tc = totalclock; totalclock < tc + 4; handleevents(), Net_GetPackets());
     }
 }


Notice how the intensity is now bitwise-ANDed with 63 rather than 127. This means that the value passed on to `setpalettefade` was now restricted to 0-63 rather than 0-127. This aligns with the effect seen in game -- the color fades from white to transparent, back to white again as the value decreases.

The commit message states that this was supposed to be a simple cleanup commit, therefore I believe the difference in behavior is unintentional. In current revisions, any value specified above 63 results in the time the color is displayed being extended, thus blinding the player for 2 seconds each time this command is called.

Edit: https://voidpoint.io...32/-/issues/195

Unfortunately, I don't think it's likely that this behavior will be restored. Maybe if a miracle happens, and even then it would only apply to Classic mode.

This post has been edited by Doom64hunter: 03 September 2021 - 11:16 AM

1

User is offline   ETPC 

#1388

View PostTheDragonLiner, on 02 September 2021 - 01:53 AM, said:


_Wrecked Ship >> You will find the entrance to this level in "RainForest Fires 2". In this level, you will eventually go through the locations of Ep1's secret level "Mystic Valley". Follow this path >> Attachment duke0006.png
Destroy and obvious Cracked Wall, platform your way onwards and there you go !

What is the point ? Well, somewhere in the level, you will find a unique Health Amulet, which will make it so that your health restores itself slowly up to the normal 255 threshold.


for some reason, i can't blow up the cracked wall. is there something i'm missing? bug? i'm getting console errors again:


ST_16_PLATFORM_DOWN/ST_17_PLATFORM_UP: bad neighbor for sector 1883!
0

User is offline   ETPC 

#1389

apologies for double post, but im stuck in Wrecked Ship. i just flipped a switch and have no idea what it did. i ran through the entire level to see if it changed anything and could not see any differences. also the console is printing the error:

ST_16_PLATFORM_DOWN/ST_17_PLATFORM_UP: bad neighbor for sector 52!

any ideas?

Attached thumbnail(s)

  • Attached Image: duke0035.png

0

#1390

Doom64Hunter. Good to see =) ... too bad it doesn't look like Polymost can't handle it =(


ETPC. For the cracked wall, this is an issue I had already reported a few years ago. I was told that it worked normally, but quite clearly it doesn't >_> I have no dreaking idea as to what's happening with this wall.
For the Wrecked Ship, I'm afraid I don't remember. You'll have to waint until I arrive there ^^;

If I recall correctly, these switches that you show in your screenshot tend to be hard to activate. Make sure that every single one of them is really activated.
Otherwise, the only I can tell you is that, if you're really lost, it may be an idea to just go back to the beginning of the level, and re-explore everything from there, pretending you've just gotten started.


BTW, for the Hints List. I have reached "Military Station". Unfortunately, I couldn't figure out an optimal way to beat the Teleporter Puzzle. It's just too complex and my attempts to study it just made me circle back to where I started, even when starting from the end T_T
I think I will upload the first part of my list once I will be done with this level.
1

#1391

View PostETPC, on 03 September 2021 - 12:23 PM, said:

for some reason, i can't blow up the cracked wall. is there something i'm missing? bug? i'm getting console errors again:


ST_16_PLATFORM_DOWN/ST_17_PLATFORM_UP: bad neighbor for sector 1883!

Appears to be a clipping bug in eduke32 which predates the clipping changes of 2019. Started in r3898.

The problem is that the crack is inside of a tiny, miniscule sector that is close to the wall:

Attached Image: capt0009.png

If you edit the map to slightly increase the size of this sector, it will be destructible again. Changing this in the engine seems to be another difficult effort, it has something to do with the detection of whether a sprite is inside a sector, and this appears to be the ultimate edge case where existing behavior was changed.

Attached File  oblvn405_fixed.zip (270.66K)
Number of downloads: 81

That console error has nothing to do with your issue. It's just a result of Zaxtor seemingly hacking his maps together resulting in boundless map corruption.

View PostETPC, on 03 September 2021 - 04:44 PM, said:

apologies for double post, but im stuck in Wrecked Ship. i just flipped a switch and have no idea what it did. i ran through the entire level to see if it changed anything and could not see any differences. also the console is printing the error:

ST_16_PLATFORM_DOWN/ST_17_PLATFORM_UP: bad neighbor for sector 52!

any ideas?


There are multiple switches like this in the map, and from the looks of it they are connected to CON script stuff, so it's hard to trace what exactly they are doing. The exit can eventually be found by going outside the ship and entering a cave.

View PostTheDragonLiner, on 03 September 2021 - 10:21 PM, said:

BTW, for the Hints List. I have reached "Military Station". Unfortunately, I couldn't figure out an optimal way to beat the Teleporter Puzzle. It's just too complex and my attempts to study it just made me circle back to where I started, even when starting from the end T_T
I think I will upload the first part of my list once I will be done with this level.


The teleport puzzle isn't too hard to brute force through. There's 3 teleporters that lead you into an inescapable death pit, but there are otherwise no dead-ends, so saving frequently is recommended while going through it.

Since enemies can't shoot you between boxes, my strategy is to always take teleporters until you find enemies you haven't killed yet, then save and try out teleporters until you find additional enemies. All boxes can be reached, btw.

This post has been edited by Doom64hunter: 03 September 2021 - 10:52 PM

3

User is offline   ETPC 

#1392

can those weird spinning heads be killed? i've put every bullet and rocket i have into them and they seem to not ever go down. worried they are supposed to drop a key or something.
0

#1393

View PostETPC, on 04 September 2021 - 01:40 AM, said:

can those weird spinning heads be killed? i've put every bullet and rocket i have into them and they seem to not ever go down. worried they are supposed to drop a key or something.


No they cannot be killed. You should try to find a way to trap them in a room you'll never go to, or in a wide area. They don't drop any keycard either.


OKAY, so I have reached ScrapBrain 1 (penultimate Ep1 level) therefore HERE is the First Part of my List of Hints for Episode One !


NightFright, don't hesitate to make your picks ^_-


Starship Explorer : Talk to NPCs, as 2 of them will open mandatory doors for you.

(I didn't find anything to say about the second level, it's pretty straight forward)

Area51b (from Dry Forest) : _Go up and to the left until you reach the wall. Inspect the tightest trees closest to it. One has a Switch to shoot. It will open a nearby tree, allowing access to this Secret Ep5 Level.

_Make sure you don't miss the switch in the "Library" near the screen.
_Don't miss the small lever behind the desk on which lie a Blue Plant and a Red Lamp.
_The BattleLord behind the door you've just opened drops a Blue Keycard. You will find a second one in the Cafee just next to the Blue Keycard door.
_Briefly later, you will find a White Console with Red red keys on it. These are special switches you will find in the level. You can't use them all, but make sure you try them every time you see one ! Those that work are mandatory and give you a hint on what they did. They also spawn enemies to guide you on the correct path.
_Follow enemy spawns until you reach the "Secured Area" room next to the Armoury near the beginning. Activate everything you see in it and follow enemy spawns. Near the door of the outside area is a teleporter pad which is Yellow and functional now.
_Check out the Laboratory which you unlocked for an Enhancement Chip and follow enemy spawns.
_Once you have used the Red KeyCard in the starting area, you will pass next to an N door which is unlocked. Remember its location as the level will end there.
_If you weren't carrying an extra Blue KeyCard all this way, you can find a spare one down the stairs near the prison cells you're next to. Use it in the last room of the corridor and follow enemy spawns. ALSO, before you go, notice the Red Door with an Inverted 7 symbol and remember it.
_Use the special Grey Switch in the "Reactor Core" room. A message tells you it failed. Go back to the Inverted 7 room mentioned earlier. You can pass by the other end of the corridor (no need to do all the outside track again). Then go to the N door to finish the level.

This post has been edited by TheDragonLiner: 04 September 2021 - 02:02 AM

1

#1394

Sorry double post, having problems with the editor >_<

Second Part.


Dry Forest : _First off, go up and immediately to the left until the wall. You should see a large tree with an opening. The Blue KeyCard lies at the bottom of it.

_Littered around the level are big logs lying on the ground. They act as teleporters, which are mandatory in order to locate the 2 remaining KeyCards required to finish the level. They are One-Way only, if you want to go back, you must either reload a save or go through a dedicated path. These Telepor-Logs are ALL strictly identical, so you can easily identify them.

_From the tree where you found the Blue KeyCard, go to the right and across the area until you find a Telepor-Log. Near a ledge with Toxic Green sludge at the bottom. Use it.

_Once you have jumped above the Toxic Green sludge, you'll be on a slope. stick to the middle as there is a mandatory switch with a camera screen. Proceed to another Telepor-Log.

_Diligently inspect the edges nearby the log you've just arrived on. There is a Red KeyCard to take. Now go back to the starting area by falling of the ledge where you found the card. Try to go back to the Log you had used previously but keep looking to your left until you see windows in the wall and the door you unlocked previously. Yellow KeyCard.

_Now in possession of the 3 keys, repeat the previous steps until where you had found the Red KeyCard. Drop to the other side this time. Use TabMap if you have doubt. Find another Telepor-Log.

_Use your cards. If you happen to be missing one, go inside the opening in the large tree nearby. It will take you on a small path which leads back to the starting area.

_Once you used the 3 cards, the rest is pretty straight forward.

This post has been edited by TheDragonLiner: 04 September 2021 - 02:09 AM

1

#1395

View PostDoom64hunter, on 03 September 2021 - 10:30 AM, said:


Edit: https://voidpoint.io...32/-/issues/195

Unfortunately, I don't think it's likely that this behavior will be restored. Maybe if a miracle happens, and even then it would only apply to Classic mode.


Just as an addendum, this is what the color inversion was supposed to look like for the ball enemies:


1

#1396

Next part of my List of Oblivion Hints, Episode 1 !!


The RainForest : Note : There are KeyCards in this level, but they're only used to access a secret stash at the beginning of the level. If you're not interested in lots of Health and Ammo, then don't mind the KeyCards.

_There are 2 fast ways to finish this level. Either going for the secret exit, or going for the Yellow KeyCard.


Normal Route : _Advance up to a large pond of water with lots of branches you can jump onto. Try to jump on the one to the right. There's a Green Pillar next to it.

_To your right, you should see an Atomic Health. Jump towards it, then climb to take it.

_You'll see a ledge nearby, and 1 or 2 Enforcers in the distance. Jump on that ledge and go to the right passed the pond. You'll find yourself above the Starting Area.

_Follow the wall on the left until you enter an enclosed path. Watch out for the jump half-way through.

_After the tight Yellow Elevator (near which the Yellow KeyCard is located), go deeper into the forest.

_Cross the bridge to the Yellow Sphere and navigate the small maze, trying to go to the Left. You'll then reach the end of the level.


Secret Level Route : _First advance up to a large pond of water with lots of branches you can jump onto. Go for the Blue KeyCard and further behind it.

_You should see the Yellow one from where you're at. Towards its Left is an area you can access with a Green Cave and a Voice. Avoid the cave and into the path next to it to a spiral staircase.

_You'll exit near lots of water. Jump towards the Left where you can see the Red KeyCard. Behind it is a Gong.

_Repeatedly fire your 5th or 8th weapon at it in order to find the Secret Exit.


Mystic Valley (Secret Level) : _Make your way through the forest until you reach the tree tops. You will need to gather the 3 KeyCards into the Restaurant with a music playing inside.

_At the center of the level is a tree top with a small Bridge and Stairs spiralling down around it. From here, you should spot a crack on a nearby tree. To the right of it is an indentation with a Red Trooper inside. Blue KeyCard.

_Back to the central tree. Use the Stairs spiralling down around it to descend, and platform your way down to the bottom of the Valley. Explore until you find a Big Stump with Green Pillars around it. Red KeyCard.

_Climb all the way back up to the top of the tree with the spiral stairs.

_If you look towards the indentation where you found the Blue KeyCard, you'll see a tree top below near you. Go on it, jump on the branch to the Left of it and the branch in front of you. You'll be next to a hole in the tree in which you must jump. Yellow KeyCard.

_Climb back again but go left instead of going to the Spiral Stairs tree. Into the Restaurant with the music.

_Use the keys and exit by the entrance. Platform to your Right, into the forest. At the end, use the Switch. The Code is for a regular secret in the next level. Backtrack to the Restaurant.

_The door near the KeyCard Slots is now open.
1

#1397

I have reached the Ante-Penultimate level of Ep2. Meanwhile next part of my List of Hints for Oblivion Episode 1 !


RainForest II : _Just like in "Dry Forest", you will have to play with the Telepor-Logs in order to gather the 3 Keycards. This time they are smaller and Bright Brown colored. Again, they all look identical, so you can identify them easily.

_Advance until you reach a pond of water with a Medkit on top of a tree. Use the Telepor-Log nearby. There are 3 but only one works. Turn around. There will be 2 Logs next to each other. Take the Right one.

_You are now above the Beginning Area (with the Medkit on a tree). Move Forward and stick to the Right as much as possible. Avoid the Logs and a dangerous pit. You'll find the Blue KeyCard.

_From here, use the closest Telepor-Log (you went passed it just before finding the card). When you used the Log, immediately turn around and go deeper into the forest. You should hear and see the Yellow Sphere. Red KeyCard.

_Backtrack by sticking to the Left. There will be a space with Enforcers behind it which closes behind you. Use the Log. Move forward and use the next Log just in front of you.

_Turn around and take the Right one again. You should be above the Starting Area again. This time look to your right and use the Log. The one that is just next to the one you've arrived at.

_Go right. Advance cautiously while sticking to the right. Yellow KeyCard.

_Use the Log against which the KeyCard was. Crouch to descend in front of you and use the Log where you killed Enforcers previously. Move forward again to use another Log.

_Turn around and use the Log on the Left. Into the building.


Military Station : _After using the Red KeyCard and pressing Two Switches. Go in the corridor and go to the "Danger" Labelled door. Near where you had the Teleporter Puzzle.

_Maze after using the Yellow KeyCard. Right-Left-Right Switch. Right-Left-Left-Right to the corner-Left-Last Right-Skip the next Left turn and Switch. You can use TabMap to backtrack to the beginning.

_The door you have unlocked is inside the Penultimate Door on the Left in the Big Corridor where you had the Teleporter Puzzle and the Steroid sprint.

_BOSS. Keep shooting at the Purple Walls until they explode. You can destroy the pesky Turret in the middle with an explosive. Then shoot the Red Dot until it explodes.

_After pressing the D Switch and the one in the Core Room, go back to the Boss's room and go Left.

_To get to the Core's Yellow Door. Go back to the Big Corridor where you had the Teleporter and Steroid Puzzles. Go inside the Penultimate Door on the Left again, the door on the Right is unlocked this time.

_One of the 2 Switches exposes the Reactor's Core. Go back to the Boss's Room. Try to shoot a Rocket at the Reactor from where you are.

_When explosions are over, step on the Bridge and jump into the Crack on the Left. Press the 9 Switch.

_Go back to the Corridor where the Puzzles were and open the 9 Glass Door. END.


This post has been edited by TheDragonLiner: 05 September 2021 - 02:28 AM

1

#1398

HOP !!

I have reached Episode 3. The second level and the secret variant are going to be a pain T_T


The Doom Base : _BOSS. To disable the Base, shoot your 8th weapon at the Circle in a Square at the center of the Base. You'll see a bunch of explosions. Kill all enemies before your Bunker gets destroyed. Kill the small waves of enemies until the door behind you opens.

_In front of the big Gate. Use the Grey Pedestal in order to place the Green Cylinder you've just picked up alongisde the KeyCard.


The Sea Temple : _Drop in the water and look for a Cave with a Green Wall. To the left of it is a small Stone Cylinder. Use it to open the door. It can be hard to get it to work.

_When you have pressed a Switch that made a Bell Sound and an explosion, you will be teleported back to the starting area. Go in the water and to the Left while paying close attention to the Ground. Near the Grey Wall is a Hole.

_After the Red Teleporter, in order to pass the White Corridor with no harm, you can use TabMap to spot the Mines.

_In the Red Room, the Switch is to the Left of the Gate.

_In the next room, you'll be above a Maze. You can skip it by bunny hopping on the Bridge before it explodes, OR use Steroids and jump.

_If you fall in the Maze, you can keep hugging the same wall all around. Just pay close attention to the walls (especially dead ends) as there are Switches you must press to escape.

_To open the Red Icon of Sin door, shoot at the Switch on its Forehead.
1

User is online   NightFright 

  • The Truth is in here

#1399

I have changed the palettes of the Battlelord respawn sprites in Oblivion's E1L5 as requested. Please check if killing the Battlelords works now as intended without ending the map prematurely. Not sure if changing the palette of the respawn sprite also affects the monster which is actually spawned. In total, five sprites were affected (#4477-79, 4509, 4514), btw.

If I didn't lose general overview, this is the only Oblivion issue that can be fixed manually right now, isn't it?

This post has been edited by NightFright: 06 September 2021 - 02:06 AM

0

#1400

End of Episode One.


ScrapBrain 1 : _Enter the Base. In the Big Central Room, go Left. Go into the Blue Teleporter on the Left. Go upstairs and enter the Blue Teleporter next to the Red KeyCard Slot. Switch.

_Come back and descend 2 floors, into the corridor. Stick to the Left.

_In the big room with Grated Floor, descend just under where you're at.

_Yellow KeyCard. Backtrack the exact path you've just taken, up to the room with 3 Red Tubes in the middle.

_When you pressed the Switch with a Screen, take the Left Blue Teleporter. Back-off into it TWICE. Descend the Stairs to the Bottom Floor.

_Blue KeyCard. Ascend 1 floor.

_Go Right. Press the Switch next to the Blue Teleporter and go in. Back off into it ONCE.

_In the Grated Floor Room, take the Teleporter to the Left, at your level. Press the E Switch. Go through the door and circle around the Central Room to the Second Next Door.

_B Switch. Backtrack to the door you skipped just before.

_C# Switch. Bactrack the previous steps until the Big Central Room. Go to the E Door. Take the door just in front of the Elevator you can unlock. D Switch (for later).

_Backtrack these steps. Take the Blue Teleporter in the room next to the E Door. Back-off into the Teleporter ONCE. Go Right. To the # Door.

_Blindness Corridor. Stick to the Right and mind the jumps until you reach a Switch. Press it and hurry back, jump Right.

_Red KeyCard. Backtrack up to the room with the A-B-C-D Screens. Ascend the Stairs to the Top Floor. Press the Switch.

_Descend 2 Floors into the corridor like last time. In the Grated Floor Room, go to the area behind the Grate in front of you by jumping on the Left side. Press the Switch and go to the door.

_Z Switch. Go back in the Teleporter. Back-off into it ONCE. Go forward into the Teleporter. Take the Elevator down. Take the door and Teleporter in front of you. Back-off into it ONCE. Go to Z Door.

_BOSS. Shoot the Multicolor Core with your strongest weapon until it explodes. Mind the numerous enemies ...


ScrapBrain 2 : _Big Room with Blue Ceiling. Once you exited the White Walls, go behind the "building" for a Switch. Go back, sticking to the Left wall all the way to a different Teleporter.

_Once you took a Blue Teleporter, press the Switch behind the Grey Door next to it, then back to the Teleporter into a different room.

_Jump up and go Left to get the Yellow KeyCard. Notice the 3 Door and remember it. Then come back to take the Blue Teleporter.

_Backtrack to the Starting Area and go downstairs. The bars on the Yellow KeyCard Door will be removed LATER. Meanwhile, on the Right of this door should be a Teleporter.

_2 Switch. Go to the teleporter indicated in the first hint.

_3 Switch. Go back to where you found the Yellow KeyCard.

_1 Switch. Go back to the 2 Door, it's just next to it.

_Find the Underwater Switch next to a Screen. Go back to the Yellow KeyCard Door, the bars have been removed.

_BOSS. Shoot at the exposed Brain with your best weapons.
1

#1401

Hep hep ! Yep, Ep2. Yep.


Battle Station : _3 Switch. Go back to the Starting Area.

_1 and 'n' Switch. Room next to you is 1 Door. B Switch.

_Start backtracking to the Starting Area. Be sure to check out the 'n' door to your Left on the way for the Blue KeyCard.

_Explore the B Door for the Yellow KeyCard. Take the Red Teleporter in the Starting Area and use your Blue KeyCard to unlock Door 2.

_Go back through 3 Door and down.

_Door 2. Destroy the Weird Red Orb to obtain another Blue KeyCard. Press Switch 4.

_Go back to B Door.

_Central Command Switch. Take the Red Teleporter in the Starting Area. Use the Elevator.

_After you jettisoned the Huge Power Cell into space, go back through 3 Door and in the Yellow KeyCard door. Use the Elevator.

_Reactor Core Switch. Follow Enemy spawns.

_Shoot the Canister and go back the way you came from to the Transport Room.


Doom Omen III : _This level has 8 Floors. All indicated by a small Grey Sign with Red writing.

_Floor 2, Blue KeyCard. Use on Floor 3. Switch unlocks a door at Floor 1 for LATER.

_Switch 3. Go to the door you unlocked at Floor 1. Jump Right. Switch and Switch 4.

_Jump to door on the other end of the room before you backtrack. Red KeyCard.

_Floor 8. (don't mind Passage 4 on your way up) Switch 5. Floor 2. Yellow KeyCard.

_Floor 6, go through Passage 4 and Transport. Yellow KeyCard Door.

_After Passage 6 is an extremely quick sequence. Wait until you see explosions near the "Out Of Order" Switch. Shoot the Switch revealed under it. Press the switch at the end of the corridor. Go Left. Blue KeyCard.

_Go back to Transport. Switch 2. Go back to Floor 1 and near Door 3. Switch 1.

_Go all the way back up to Switch 2 and passed it.

_You should be able to handle yourself now.
1

#1402

IMPORTANT : When I told where to find the Secret Levels, I made a HUGE Mistake about the one in Temple of Illusions 3. The path I showed is actually the NORMAL Path >_<
That's because the Secret Path is actually a lot easier and less tedious than the normal one >_>

Don't worry everything will be made a ton clearer whenever my list of hints will reach this place. I'm noticing that level is one of my least favorites of the game X_X


Meanwhile, small part before 2 big ones !


Organic Ship : _You will find the Yellow KeyCard in the Supply Rooms. You should have passed the Yellow Slot Door on your way earlier.

_Red Gib Switch. Just go straight ahead when exiting the room.

_Red KeyCard. Go back to the beginning of the level.

_Blue KeyCard. Go back to just before you got the Red one.

_Destroy the Heart and head to the Transport Room near the Supply one.
1

#1403

BIG !

BTW, Doom64Hunter, don't worry about the Pesky Pyramid anymore. Thanks to a struggle of Luck, I have somehow managed to lay down a reliable path. However there's another level which will REALLY be problematic. It's the "Death Dimension" (E5L5). The Big White Maze with the golden cubes that change the layout of the rooms. This one is gonna suck X_X


Alien Asteroid Part 1 : _When you enter the Caves after the area with a Whistling Noise, you can swim under the pond of water. A Scuba Gear can be found in the Left Turn behind the pond.

_Find the 4 Switches, exit the pond, and take the Right turn behind the pond.

_After climbing up the Red Cave, don't miss the Button on the Desk in the door to your Right.

_You can destroy the White Bulb which shoot Rockets at you. Switch next to Screen.

_The game expects you to backtrack through the Red Cave, BUT instead you must go passed the ForceField next to you. DO NOT jump into the Red Tube.

_Once you reached the Blue KeyCard and pressed the Switch, go back all the way you've been through to the room with the Red Pond and the White Bulb. Yellow KeyCard.

_Now you can backtrak through the Red Caves, up to the room with the Whistling Sound before the pond of water.

_Fusion Refinery. Try to kill the enemies behind the door without dammaging the generators. Once done, de-arm yourself (Weapon 1) and explore the room until the exit opens by itself.

_Preventing the generators from exploding will allow you to access a Secret Area to the Left and Right after exiting. It contains a PassWord to access the Secret Level later in the episode.

_If the generators explode, the exit will open but the Secret will be blocked. We'll give you the PassWord anyway ^_-

_After you exited the Fusion Refinery, go Left and find a Teleporter. The one in the secret leads to the same path so don't worry.

_Don't miss the switch before heading into the Green Corridor.

_You'll unlock a door to an area you've been to before. Don't miss the Teleporter just in front of the Switch.

_Pull the Switch and go through the Red Caves again in order to go back to the beginning of the level. Follow enemy spawns.
1

#1404

MASSIVE !

I have just beaten the Lava Caves. I was originally gonna cry out for help with the maze but again I managed to lay down a reliable path with a struggle of luck ^^


Alien Asteroid Part 2 : _At the 3 Way Cross in the Caves, go Left and use a PipeBomb against the Red Danger Thing.

_Go back to your Left in order to do the same on another one. Go back and take Left. At the next 3 Way Cross, go Left.

_You can take the Yellow KeyCard. Go back out of the Caves, to where there is a Red KeyCard Slot. Go up the Slope.

_Switch, go back to the beginning of the level.

_Yellow Caves. Go Right and stick to it until you find the Red KeyCard.

_Keep to the Right. At the fork, go in front of you until you can use your Yellow Key.

_Go back to the beginning of the level. Don't mind the door you have unlocked yet. Go use your Red KeyCard.

_Go Right to obtain another Red KeyCard and come back to use it right away.

_Press the Switch to obtain the Blue KeyCard and RUN BACK as FAST as you can to the Door you had unlocked previously. Use your Card.

_Exit to the Starting Area and go Right.

_Repeatedly shoot at the Red Squares.

_BOSS. Shoot at the center of the Climbing Box with your 3rd or 4th weapon. You can destroy the Turrets. You can use your 5th or 8th weapon in order to destroy the White Walls that shoot lasers at you. Enemies will regularly come from behind you. Be expeditive about them, as you're on a Time Limit here.


DoomsDay Battle : _Big Missiles will come at you from the Right and the Left. Try to hit their Big Red Dot with your 5th weapon to destroy them.

_BOSS. Shoot at the Dot at the center of the Ship. Purple Flashes mean you deal damage. You can destroy its Rocket Launchers by shooting at the Red Dots on its Wings. Can be important since they'll mess up your Shield and eventually One-Shoot you.

_Later, you will find a Yellow and a Red KeyCard. It is more optimal to go to the Yellow Door first.

_BOSS. Just shoot at the Red Dot. DON'T use explosives. You can destroy the Turrets.

_Secret Level. Near the end, just before you obtain the final Blue KeyCard, you will see a row of Switches in front of a Door. Use the PassWord you should have seen in "Alien Asteroid Part 1". Otherwise
Spoiler
. Know how to count, know your alphabet and use yer brain.
2

User is offline   ETPC 

#1405

you are doing the lord's work
0

#1406

View PostETPC, on 08 September 2021 - 12:06 PM, said:

you are doing the lord's work


You're inflating my ego ^^;


This is the last huge chunk. The levels after this are more reasonable.


Alien BioDiversity (Secret Level) : _In the little Maze with Green Ground and Tall Walls. At the first intersection, go Right and Right again for a Switch. Go back to the first intersection and go the otherway to a Red Room.

_In the room with tons of Orange Bubbles, don't forget to activate the Switch near the Muddlelizer. You can't take the weapon yet but you can reach that Switch.

_Blue Bubble Room. You can destroy the darker Bubbles, keep this in mind for any room with Bubbles. Go down the Middle. You will arrive above the little Maze of earlier.

_Blue KeyCard, go back to the Blue Bubble Room.

_Inspect the room you've entered. Find a Grate in the ground and follow the Vent. Go through the door. Go Right to find the Red KeyCard and backtrack toward the beginning of the level to use it.

_Once you have reached the top of the Huge Red Room with Pillars, you can obtain the Chaingun Infinite Ammo Enhancement Chip. Go Left, through the center wall and use your Night Vision Goggles. You'll have to fight a Boss.

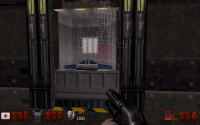
_BOSS (if you went for it). Shoot the small Red Eyes until they're Grey. Shoot the Blue Squares to destroy the 4 Cylinders. Then shoot the Big Eye. You will be brought back to where you were before.

NOTE. The game labels it as the "Petrify Gun Regeneration Chip", but this is FALSE.

_Go to the end of the Green Corridor that shoots at you. In the small room at the end is a switch to open the door in the corridor.

_After you took the Yellow KeyCard and taken an Elevator down. Go Left in the corridor. Go in the room with Bright Flesh Walls for a Switch. Then take the Dark Door next to this room.

_Use the KeyCard. Notice the pressence of the Nuke Button in the Toxic Purple Sludge, and remember it.

_Jump onto the top of the Green Platform. DO NOT MISS the Switch in front of you near the ceilling. Don't descend and proceed, it's a dangerous dead end.

_Backtrack to the little Maze you went through at the beginning of the level.

_At the first intersection, you can go Left to fetch the Muddlelizer if you wish. Otherwise go Right, and then Left. The dead end is gone now.

_BOSS. To defeat it quickly, shoot at the Clear Red button at the center with your 8th weapon until the Purple Flashes stop, then shoot with your 2nd,3rd or 4th weapon. A few enemies will keep spawning but they're NOT infinite.

_DON'T MISS THE SWITCH before teleporting out of the room. The Nuke Button is now accessible.
1

User is online   NightFright 

  • The Truth is in here

#1407

Instead of posting it bit by bit, it might make more sense to collect everything and release it all at once. Otherwise you are turning this thread into "The inofficial Oblivion walkthrough", which I'd like to avoid. Would also be easier for me later to transfer this to the walkthrough text file.
0

#1408

View PostNightFright, on 08 September 2021 - 11:35 PM, said:

Instead of posting it bit by bit, it might make more sense to collect everything and release it all at once. Otherwise you are turning this thread into "The inofficial Oblivion walkthrough", which I'd like to avoid. Would also be easier for me later to transfer this to the walkthrough text file.


Could have said it earlier ...

Well the proposal I can make to you right now, is that I can upload a text file for the remainder of Episode 2 (I can also re-compile Ep1 and previous Ep2 levels if you wish), and another Text file for Episode 3, which I finished recently.
0

User is online   NightFright 

  • The Truth is in here

#1409

If you could make one post per episode at least, it'd help a lot.
1

#1410

View PostNightFright, on 09 September 2021 - 12:14 AM, said:

If you could make one post per episode at least, it'd help a lot.


Not sure what you want exactly but I am going to do my thing, I think it will be most practical for everybody.

I have re-compiled Episode 1 and 2, and I have separated Episode 3 which I finished recently. The things are a bit rough looking, I tried to lay them out in a clear way. Sorry I'm not a Notepad expert >_>

Attached File  Oblivion Hints, Episode 1.txt (14.22K)
Number of downloads: 76


Attached File  Oblivion Hints, Episode 2.txt (12.27K)
Number of downloads: 80


Attached File  Oblivion Hints, Episode 3.txt (17.08K)
Number of downloads: 71


For Episode 4 and 5, I don't know what I should do. Right now I am writing both together in the same file. I think it will be more practical because you would just have to skip ahead if Ep5 doesn't interest you, and you wouldn't have to open a separate one if it does.

Please tell me NOW what you think is better, and I'll proceed whenever I'll be done.
4

Share this topic:


  • 68 Pages +
  • « First
  • 45
  • 46
  • 47
  • 48
  • 49
  • Last »
  • You cannot start a new topic
  • You cannot reply to this topic


All copyrights and trademarks not owned by Voidpoint, LLC are the sole property of their respective owners. Play Ion Fury! ;) © Voidpoint, LLC

Enter your sign in name and password


Sign in options