Duke4.net Forums: Creating A Circular Wall Is A Pain In The A - Duke4.net Forums

Jump to content

Page 1 of 1
  • You cannot start a new topic
  • You cannot reply to this topic

Creating A Circular Wall Is A Pain In The A  "cannot get that red line to appear in the middle of square,maybe bug"

User is offline   Nukester09 

#1

Posted Image

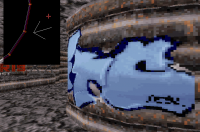
Could somebody tell me what I'm doing wrong here,that is,if I'm doing something wrong here,
or there happens to be a bug in the program?

I got this pic tutorial off of JS Build and I'm trying to create a circular wall.

According to the tutorial,

Quote

The following steps are done in 2d mode
Have a look at the following screen captures. These images show the various steps in making a circular sector keeping the aforementioned in mind. Decide where in the parent sector you want the circular sector(s) to be and draw a line from one wall to the opposite wall (add vertices if needed - you can delete them later). Place two vertices on this new line; they will be the start points for the first half of your circle. Make sure that those two points are placed on that line an equal number of grid squares apart (this will make it real easy to find the exact center if you were to make it a rotating sector). Once the first half is in place, (you do that by holding the cursor between those two points and pressing the [ C ] key), redraw the line between those initial two points. You have to redraw that line because after using the [ C ] key to draw the first half of the circle, the line is removed in the process. Screens one through five show the steps just mentioned


I'm doing what they're saying here to the letter but I cannot get that damn red line to appear in the middle
of the square!

If anybody could help me out here that would be great.
0

User is offline   Spiker 

#2

Dude you have to insert points before drawing the "red line". So first insert some points by pressing INSERT :P
0

User is offline   Nukester09 

#3

Yeah I know that,

I first created the square then,on the right hand side of the square I created a vertice by pressing
(insert) then, I did the same on the left hand side.

Ok,now we have 6 vertices total.

Next,Inside the square I evenly created 2 more by pressing (spacebar).

The next thing I did is on the right hand side,I hit (spacebar)again on the green vertice in the center,
then from right to left,I hit the other 3 vertices straight down the center of the square,
by the time I hit the last vertice on the left side,"No Red Line Would Appear."
0

User is offline   Spiker 

#4

I dont know what you are doing wrong but creating a red line is one of the easiest things in mapster!
0

User is offline   The Commander 

  • I used to be a Brown Fuzzy Fruit, but I've changed bro...

#5

http://infosuite.dukerepository.com/

All build questions and answers are in there including yours.
0

User is offline   Nukester09 

#6

Through trial and error I finally got it,I found though that you can't use the room itself you have to
create another square around it first.I'm sure JS Build mentioned this in writing but in the pics you
don't see this of course.

So anyhow I got a halfcircle coming out of the floor,now I'm trying to figure out how to place
one of these sprites so that it wraps around the thing,the whole thing.

The first thing I noticed when I went to place the sprite with the white crosshair pointing to a section
of the halfcircle"notice I said,section"is that a simple pink tile was placed within it,it was shaped
rectangular along the halfcircle and automatically placed vertically between "a section" of the
halfcircle and not the whole thing.

The first question is,what do I need to do in order to get this sprite to wrap around the whole thing
and not be placed the way it is,without distorting the halfcircle in the process?

The second question is why is it a pink sprite,what happened to the transparency I placed on it
in editart before I got to build?
0

User is offline   chicken 

  • Fashionable Modeler

#7

You cannot wrap a sprite around a cylinder. It is always flat.

But you can apply the sprite to the walls of the cylinder - as a texture.
Then you have to align the texture correctly.

In Mapster the transparent parts will look pink, but if you test your map in game then the pink parts will become black.

This post has been edited by chicken: 25 May 2009 - 09:59 AM

0

User is offline   Rellik 

#8

It can be a bit tricky to wrap decals around a circular surface, but it is doable.

If you add a second thin circle sector around the surface and use wall masking, then you can add your decal using the wall masks (M key), it is a good idea to set the upper wall and lower walls of the masking surface the same as the masking texture for alignment purposes. The quick align key '>' works best when the upper/lower textures are the same width as the masking wall.

A second thin sector would be needed if the decal is only intended for a smaller part of the wall to conceal the oddities, below is an example of what I am talking about, the pink lines are the masking walls. I also attached the demo map.

Attached thumbnail(s)

  • Attached Image: circlemask.png

Attached File(s)


This post has been edited by Rellik: 25 May 2009 - 11:43 AM

0

User is offline   chicken 

  • Fashionable Modeler

#9

:D
Holy Cow...
Please ignore my last post. :)
Rellik, that's a fine trick, did you figure that out yourself? Or is there a tut (with more stuff like that)?
I think it's not in the InfoSuite from DNR...

This post has been edited by chicken: 25 May 2009 - 01:59 PM

0

User is offline   Jimmy 

  • Let's go Brandon!

#10

View PostRellik, on May 25 2009, 03:34 PM, said:

It can be a bit tricky to wrap decals around a circular surface, but it is doable.

If you add a second thin circle sector around the surface and use wall masking, then you can add your decal using the wall masks (M key), it is a good idea to set the upper wall and lower walls of the masking surface the same as the masking texture for alignment purposes. The quick align key '>' works best when the upper/lower textures are the same width as the masking wall.

A second thin sector would be needed if the decal is only intended for a smaller part of the wall to conceal the oddities, below is an example of what I am talking about, the pink lines are the masking walls. I also attached the demo map.


Oh man, what a simple solution, I can't believe I've never seen this or thought of it.
0

User is offline   Moggimus 

#11

View PostCaptain Awesome, on May 25 2009, 06:20 PM, said:

Oh man, what a simple solution, I can't believe I've never seen this or thought of it.


Indeed... makes me want to give myself a facepalm.
0

User is offline   Nukester09 

#12

Rellik,do you have to kextract this example file first in order to look at what your talking about,
because,I keep getting this message, "map circlemask.map not found!"?
0

User is offline   Rellik 

#13

View Postchicken, on May 25 2009, 03:59 PM, said:

:D
Holy Cow...
Please ignore my last post. :)
Rellik, that's a fine trick, did you figure that out yourself? Or is there a tut (with more stuff like that)?
I think it's not in the InfoSuite from DNR...


It's just a play on the age old tactic of placing things one tiny grid space away from the wall, it's also the best way to have one wall have multiple textures by layering the skinny sector pieces.

View PostNukester09, on May 25 2009, 09:09 PM, said:

Rellik,do you have to kextract this example file first in order to look at what your talking about,
because,I keep getting this message, "map circlemask.map not found!"?


it's a zip file, so you will need to unzip it first if you haven't already.

Where are you getting this message? in Windows, Mapster, or Eduke? I did this in Mapster32 so there may be a compatibility problem with classic Build.

This post has been edited by Rellik: 25 May 2009 - 08:36 PM

0

User is offline   Nukester09 

#14

I got this message in mapster.
I typed, duke3d -map circlemask.map
The screen you see just before the level pops up showed it was just about loaded,then I got that message.
0

User is offline   The Commander 

  • I used to be a Brown Fuzzy Fruit, but I've changed bro...

#15

What the hell? Are you using build.exe and not Mapster32.exe?

http://wiki.eduke32....e32_current.zip

This post has been edited by The Commander: 26 May 2009 - 03:00 AM

0

User is offline   Rellik 

#16

^ Yeah, get EDuke32, you can load maps within the game.

The map I posted is really only meant as a demonstration, and not an actual playable map, so it would be preferable to view it in Mapster32.

This post has been edited by Rellik: 26 May 2009 - 07:50 AM

0

User is offline   Nukester09 

#17

I don't know about running eduke32 I tried this program before and I couldn't get it to setup properly.
I was just reading the post next to mine,this member has an ATI card which I don't have and they have
graphics problems,lucky them,I couldn't even get the program to run at all.

Yes,Commander Iam using Build.exe and I'm running it through Dosbox on a XP environment as well.

I have a 6800 Nvidia card not an ATI though.

If either one of you could give me a detailed dummies guide in order to make running eduke32 worth
my time,I might just consider switching over,if not then I'm just as content doing the same old.

You know what though, if it wouldn't be a bother Rellik,could you come up with more screen grabs
with a detailed description of what's going on with your masking tutorial?

This post has been edited by Nukester09: 26 May 2009 - 01:46 PM

0

User is offline   Nukester09 

#18

Whoooooops lol I quoted myself by mistake,I was looking for the edit button though and couldn't find it so
i guess that's ok.

Being I'm here I'd like to add something more.
Rellik,looking at your thumbnail,I noticed the area outside the surface you said to hit the (M) key is a purple
color,I'm going to assume this is the Mask you mentioned,In 2D mode I couldn't get that to change from
red to purple like you did.

One thing I can tell you though,I was up late last night,to late,attempting a shot at your tutorial.
This is pretty much what resulted out of it,

I pulled the halfcircle out of the floor,placed white crosshair on a section of it then hit the (M) key.
A really strange thing occurred,not only did a sprite appear but it appeared in the wrong place,
it actually spanned from the top edge of the halfcircle straight up to the ceiling,why?

I tryed this both with and without attempting to create a mask and the same thing happened both times.

Whether you pointed the crosshair on the halfcircle or you pointed it at the floor,bty the pointing it at the
floor thing I got as a suggestion from JS Build,they also said,"whatever you do,don't point it at the ceiling.

Basically,everytime I hit the (M) key while pointing it either at the floor or actually within the halfcircle.
a sprite would appear,as I mentioned earlier from the top of the halfcircle and stretching all the way to
the ceiling,this whole masking thing seems very confusing.
Please explain what is going on here,
Thanks
0

User is offline   Rellik 

#19

View PostNukester09, on May 26 2009, 04:39 PM, said:

Whoooooops lol I quoted myself by mistake,I was looking for the edit button though and couldn't find it so
i guess that's ok.

Being I'm here I'd like to add something more.
Rellik,looking at your thumbnail,I noticed the area outside the surface you said to hit the (M) key is a purple
color,I'm going to assume this is the Mask you mentioned,In 2D mode I couldn't get that to change from
red to purple like you did.


That's because I changed the sector wall to be a wall that blocks passage through, that's what makes it pink. (B Key)

Quote

One thing I can tell you though,I was up late last night,to late,attempting a shot at your tutorial.
This is pretty much what resulted out of it,

I pulled the halfcircle out of the floor,placed white crosshair on a section of it then hit the (M) key.
A really strange thing occurred,not only did a sprite appear but it appeared in the wrong place,
it actually spanned from the top edge of the halfcircle straight up to the ceiling,why?

I tryed this both with and without attempting to create a mask and the same thing happened both times.

It's supposed to do that, a masked wall spans between the floor and the ceiling. After seeing your other thread, I now understand what you're after which is furniture, I was thinking columns or half circle areas which is what my map demonstrates, so doing furniture type stuff can only be accomplished by doing what Chicken suggested by applying the texture directly to the lower wall and have the pink transparency turning to black in game.

Quote

Whether you pointed the crosshair on the halfcircle or you pointed it at the floor,bty the pointing it at the floor thing I got as a suggestion from JS Build,they also said,"whatever you do,don't point it at the ceiling.

Basically,everytime I hit the (M) key while pointing it either at the floor or actually within the halfcircle.
a sprite would appear,as I mentioned earlier from the top of the halfcircle and stretching all the way to
the ceiling,this whole masking thing seems very confusing.
Please explain what is going on here,
Thanks


As I said, what you want isn't what I demonstrated earlier, just apply the sprite texture directly to the lower part of the sector wall segments by copying [tab key] and pasting to each of the circular segments [enter], then do a quick align on the first counterclockwise segment[> key] If the sprite dosen't fit the curve, resize the fist segment and paste it again to the other segments and do a quick align again, a little bit of trial and error and you should get a pretty good fit.

Edit: Here's something I whipped up real quick, it uses all textures from Duke3D

Posted Image
You'll notice that I used the thin wall trick to add a baseboard to the credenza type desk...

This post has been edited by Rellik: 26 May 2009 - 09:55 PM

0

Share this topic:


Page 1 of 1
  • You cannot start a new topic
  • You cannot reply to this topic


All copyrights and trademarks not owned by Voidpoint, LLC are the sole property of their respective owners. Play Ion Fury! ;) © Voidpoint, LLC

Enter your sign in name and password


Sign in options