TROR Basics?
#1 Posted 14 April 2012 - 09:34 AM
I’ve been working with the Build editor since I bought the Atomic Edition hot off the shelf back in 1996. Three days ago I downloaded and installed “eDuke32_latest” and began learning Mapster32. My main motivation being the TROR capabilities. However, I am having difficulty wrapping my mind around some of the basic concepts here.
I spent the past three days scouring the web for any documentation, FAQs and Forums, but have found only a few posts that seem to assume a basic knowledge beforehand. Helixhorned’s tutorial was the most informative so far, but it also assumes the reader has a basic knowledge of TROR. I noticed several references to prior tutorials that gave a “hold yer hand” step-by-step explaination, but could not find the actual tutorials. Can someone please point me in the right direction? (as long as its not the door) lol
Also, there are a few issues with my Mapster, such as; the Alt-S function rarely works, even when there is only a single sector within a constrained sector. (One white sector within one white sector.) But, I’ll address these later, as I haven’t searched the Forums for them yet.
Thanks
#2 Posted 14 April 2012 - 09:43 AM
As for the issue with Alt + S, it sounds like you're pressing it in the actual null space. It's a bit counter-intuitive if you aren't familiar with it, but you need to press it from within valid player space while one of the walls in the loop you want to turn into a "red" sector is highlighted.
#3 Posted 14 April 2012 - 03:40 PM
MrBarefoot, on 14 April 2012 - 09:34 AM, said:
I've been working with the Build editor since I bought the Atomic Edition hot off the shelf back in 1996. Three days ago I downloaded and installed "eDuke32_latest" and began learning Mapster32. My main motivation being the TROR capabilities. However, I am having difficulty wrapping my mind around some of the basic concepts here.
I spent the past three days scouring the web for any documentation, FAQs and Forums, but have found only a few posts that seem to assume a basic knowledge beforehand. Helixhorned's tutorial was the most informative so far, but it also assumes the reader has a basic knowledge of TROR. I noticed several references to prior tutorials that gave a "hold yer hand" step-by-step explaination, but could not find the actual tutorials. Can someone please point me in the right direction? (as long as its not the door) lol
Also, there are a few issues with my Mapster, such as; the Alt-S function rarely works, even when there is only a single sector within a constrained sector. (One white sector within one white sector.) But, I'll address these later, as I haven't searched the Forums for them yet.
Thanks
I'm wondering if you can help us out. The TROR mapping section on the wiki was only written about a week ago, and I'm not sure how friendly it is for people who have never tried to learn to use TROR before. If there's something on that page that you don't understand, ask about it here, and I'll see whether or not anything in the wiki will have to be re-written for easier understanding.
#4 Posted 14 April 2012 - 07:56 PM
Okay first off I just want to say that the search function on these forums sucks. I found my post through google.
Anyway here are my TROR instructions:
http://forums.duke4....help-with-tror/
How to build your first TROR Map in 10 simplified steps.
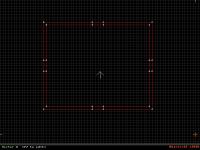
1) Let’s start by switching the grid unit size. Press “G” key until you have the largest grid squares available. Make your first sector (valid player space) 5 by 5 squares. Do this by drawing a big square white box. (This is done by the “spacebar” key and moving the mouse in 2D mode on the Mapster grid).
*Note - You can Toggle between 2D & 3D mode by using the numeric pad <Enter> key while the arrow marker is within a valid player space (sector ).
2) Within the first sector you just created, create another sector box. Make this sector box 1 grid square by 1 grid square. This is done by drawing a sector within the first sector square you just created. Trace out that inner sector again so it becomes a red walled sector. Make sure you create points over top of every other existing point. These points on the wall / grid are called vertices.
3) Highlight the red walled sector you just created by holding the right "ALT" key and using the mouse to draw a green lined box around the red sector. This will select this sector so we can extend it.
4) Once the sector is highlighted release “ALT” and press "CTRL" + “E” (To Extend)
5) Choose whether you want to create an over lapping sector above on the ceiling or below on the floor. Use either “A” for (Above) or “Z” for ( below). Choose to press “Z” for the purpose of this article.
6) Switch the editor to 3D mode: Make sure your arrow cursor is inside the big white sector box. If not, right mouse click in that box to move your marker there. Now press the numeric pad “enter” key.
Note: You can move your position in 3D mode by using the arrow keys on the keyboard. (not the numeric pad). Use the “A” & “Z” keys to control your height for up and down in 3D mode.
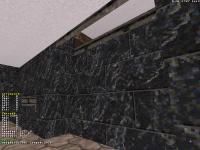
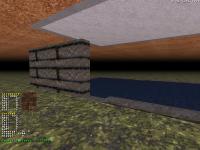
7) Now lower your perspective so that you can pass through the black ROR tile on the floor. This area below is called the Extended sector space. Lower the floor until you are happy with the results. Use (Page Up/ Page Down) Keys on your keyboard while pointing at the floor which will lower or raise your floor height. Adjust it according to your preference lower it enough so that you can’t see the ROR tile above. You can also adjust your ROR tile you just created using the same method. But have your cursor on the ROR tile instead of pointing at the floor.
Once your marker has entered into the Extended sector space switch back to 2D Mode using the numeric “enter” key.
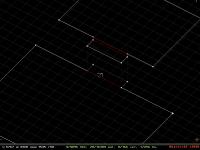
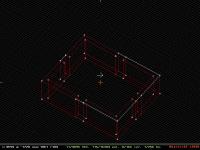
8) Press “CTRL” + “A” you will notice your red walled sector will turn white. This is how you will attach another sector below. Draw another sector (box) connecting to that white box on one of the sides.
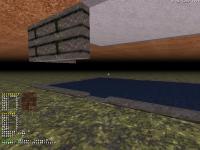
9) Switch into 3D Mode and press the “I” while pointing at the Black tile “ROR” to reveal your sector below your main sector.
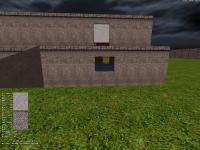
NOTE: You can also make the ROR tile a different tile like a water tile and also make that tile transparent by using the “T” key to toggle whether it’s opaque. To select a different tile press the “V” key twice on the keyboard while pointing directly at the ROR tile in 3D mode. This will allow you to choose your tile of choice.
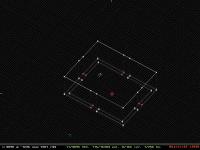
10) Once you get comfortable with the basics principals, you can build multiple levels over levels. You can toggle between these layers in 2D mode using Page Up / Page Down on your keyboard.
Congratulations if you managed to make it this far. You now have a Room Below your Main Room without needing to add a Sector Effector warp!
This post has been edited by Paul B: 14 April 2012 - 08:15 PM
#5 Posted 16 April 2012 - 05:47 AM
Micky C, There are some points that could be clarified, but so far nothing major. Once I resolve a few more issues and get a clue as to what I'm talking about, I'll send you some feedback.
And thank you Paul B.
I get the jist of it all, but I'm not able to manipulate some things properly. Extending down and creating rooms below is simple enough, I got that from Helixhorned's tutorial, but building up is not so easy when it comes to windows and doors. When I extend up I get a single line wall blocking access from one layer to another, so that creating a window is not possible. I know I'm missing something.
This post has been edited by MrBarefoot: 16 April 2012 - 05:50 AM
#6 Posted 16 April 2012 - 06:34 AM
But if you want to connect two layers, make sure that their floor and ceiling got the same height.
The wall between those layers will still be white until once you have clicked on it.
From what I can see on your screenshots, only the small sector (window?) between the rooms got extended.
If you want to see through the window to the second room that is supposed to be higher, than you will have to extend the first room too.
This post has been edited by Mia Max: 16 April 2012 - 06:35 AM
#7 Posted 16 April 2012 - 02:31 PM
Also, if you want to make a window in the top layer, but have nothing in the bottom layer, delete that small sector in the bottom layer, extend the big sector, make the top layer the active layer, then connect those sectors in the top right corner to the big sector. You can then add a door or something to the bottom layer if you wanted.
Perhaps I should add a TROR example for this on the wiki.
This post has been edited by Micky C: 16 April 2012 - 02:32 PM
#8 Posted 19 April 2012 - 08:06 AM
What I am trying to do is make a simple little two story building with windows and doors on both levels. Simple, right???
Wow, another issue! We are not allowed to attach a .map file?
#11 Posted 19 April 2012 - 09:47 AM
So, the first thing you have to do is to create a big sector that is supposed to be the outdoor area.
Then select the whole sector and expand it.
After that, you can create your buildings in this sector.
But you cannot make them as simple as you usually would do.
If you draw a sector into the expanded sector, it immediately turns red-walled and you cannot just delate it to make it white-walled, because you will lose the whole expansion.
So first you have to select the walls (shift+mouse) of the new sector and expand it as usual.
Then you can delate it and you will get your white walled building.
Now you can change the building in both floors independently.
It's really not easy and you will need alot of practice.
This post has been edited by Mia Max: 19 April 2012 - 09:48 AM
#12 Posted 19 April 2012 - 01:30 PM
#13 Posted 19 April 2012 - 09:42 PM
I'm sure that once you go into 3D mode, and press 'i' to reveal the different layers, you'll see how it works a lot better.
Edit: I've added a 2 story building mapping example to the page, I hope that helps. I also added a small list of TROR maps which are good examples to look at to see the feature in use.
http://wiki.eduke32....uilding_Example
This post has been edited by Micky C: 19 April 2012 - 10:15 PM
#14 Posted 21 April 2012 - 09:44 PM
Thank you again Micky C.
Your new tutorial is much better. After several attempts at trying to follow explicitly your instructions to no avail, I started guessing outside the box a bit (no pun intended).
When building a wall of say, a building, I am used to raising the floor of the wall sector UP to ceiling height, but when viewed from the upper z level in 2d mode after extending, the white sector lines in the extension were broken with red at places. I tried lowering the ceilings of the wall sectors before extending, and the white upper level sector lines became a clean outline.
I’m not sure if that was the fix-all for me or if something else from your post coincidentally clicked at the same time, but it does kinda make sense.
#15 Posted 21 April 2012 - 10:14 PM
#16 Posted 22 April 2012 - 07:36 AM
Micky C, on 21 April 2012 - 10:14 PM, said:
I started with a simple building layout.
If I raise the walls from the floor UP...
Then extend the outer sector, the upper level looks like this.
Note that the white sector lines are broken with red lines.
If I lower the wall sectors from the ceiling DOWN...
Then extend the outer sector...
The upper layer white line is now a clean outline.
Apparently this is an important point, because obviously you cannot edit the upper layer properly when the white sector lines are broken up.
#17 Posted 22 April 2012 - 09:41 AM
#18 Posted 22 April 2012 - 09:50 AM
Can you post your map so I can have a look on it?
#19 Posted 23 April 2012 - 11:35 AM
Mia Max, on 22 April 2012 - 09:50 AM, said:
Can you post your map so I can have a look on it?
I know I had a good reason for doing my walls this way, but I've been doing it for so many years, I can't recall exactly why now. lol But, now that you mention it, this does waste a lot of walls...
Here's the map I was using in my example, but it is really nothing more than what you see in the pics I posted.
1.zip (755bytes)
Number of downloads: 229

Help
Duke4.net
DNF #1
Duke 3D #1


